Moringa Paratha Recipe | Soft Drumstick Leaves Paratha
This moringa paratha recipe brings fresh drumstick leaves, whole wheat atta and gentle spices together in a soft, savoury flatbread. The key is to wash the leaves, make a workable dough and cook each paratha all the way through. Brown spots alone are not a reason to stop cooking.
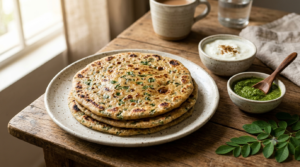
Freshly cooked moringa parathas made with whole wheat atta, tender drumstick leaves and aromatic Indian spices.
It works for breakfast with curd or as part of a simple lunch with dal. However, parathas meant for a lunchbox or journey need safe storage, not a half-cooked shortcut. Here is the method, including practical checks for doneness and clear limits on health claims.
Moringa Paratha Recipe at a Glance
In this moringa paratha recipe, tender drumstick leaves go straight into the whole wheat dough. The leaves add an earthy, slightly bitter note, while cumin and turmeric give the paratha a familiar home-style flavour. You can use curd for a softer dough or skip it.
- Course: Breakfast, lunch or dinner.
- Diet: Vegetarian; vegan if you omit curd and use vegetable oil instead of ghee.
- Original batch: 2 cups atta and 1 packed cup of fresh moringa leaves.
- Estimated preparation: About 15 minutes, excluding any extra leaf-cleaning time; not kitchen-tested.
- Estimated cooking: About 15 minutes for the batch; actual time depends on size, thickness and tawa heat.
- Estimated yield: Up to 8 small parathas, not a verified test yield. Larger parathas give fewer portions.
These times and portions come from the original recipe, not a documented test batch. Cook until done rather than stopping when a timer ends.
Moringa Paratha Recipe: Ingredients and Choices
This moringa paratha recipe keeps the original ingredient proportions, which are simple and worth retaining. Use fresh, tender leaves rather than the thick stalks, because tough stems can spoil the texture and make rolling difficult. Start with less water than usual since washed leaves may retain moisture.
Ingredients for This Moringa Paratha Recipe
- 1 cup fresh moringa or drumstick leaves, tightly packed before cleaning
- 2 cups whole wheat flour (atta), plus a little for rolling
- 1 teaspoon cumin seeds
- 1/2 teaspoon turmeric powder
- 1/2 teaspoon red chilli powder, or less to taste
- 1/2 teaspoon ajwain (carom seeds), optional
- Salt to taste
- 1 tablespoon plain curd, optional
- 1–2 teaspoons ghee or cooking oil for roasting, with more only if needed
- Clean drinking water, added gradually as needed
Optional Additions and Allergen Check
For flavour, you may add a finely chopped green chilli or a little grated carrot. The original version also suggests besan and sesame seeds. These change the dough, so add them only if everyone eating the paratha can safely have them.
| Ingredient | Why it matters | Simple adjustment |
|---|---|---|
| Whole wheat atta | Contains wheat and gluten | Not suitable for wheat allergy or coeliac disease |
| Curd or ghee | Contains milk ingredients | Omit curd and use suitable vegetable oil |
| Sesame seeds | Potential sesame allergen | Leave out if sesame must be avoided |
| Besan | Made from chickpeas; relevant for some legume allergies | Omit when uncertain |
Check packaged spice mixes for ingredients and cross-contact warnings too. If someone has a diagnosed allergy, avoid their trigger and keep preparation tools clean. The US Food and Drug Administration (FDA) food allergy guidance explains why ingredient checks matter.
How to Clean Moringa Leaves Safely
Fresh leaves matter in a moringa paratha recipe, so choose food-grade greens from a reliable source. Discard leaves that look spoiled and remove coarse stems, insects and visible dirt. Wash your hands and clean the chopping board before you begin, especially after handling raw ingredients.
Rinse the leaves well under clean running water, then let them drain. Do not wash produce with soap or household detergent. The FDA recommends washing fresh produce under running water as part of safe food handling. Finely chop the drained leaves so they spread evenly through the dough.
Some bitterness is natural to moringa leaves. Use tender leaves and balance them with spices or curd rather than promising a bitter-free result. Keep the leaves refrigerated if you are not preparing the dough straight away.
How to Cook This Moringa Paratha Recipe
Mix the leaves with atta and spices, knead a soft but manageable dough, then roll moderate-thickness rounds. Cook on a hot tawa, turning as needed, until both surfaces and the centre cook through. Do not pack or serve a paratha that still has raw, sticky dough inside.
Mix and Knead the Dough
- Combine the dry ingredients. Put atta, cumin, turmeric, chilli powder, ajwain and salt in a clean bowl. Mix well so no spice remains in one spot.
- Add the greens. Fold in the finely chopped, drained moringa leaves. Add curd now if using it, then mix again to spread the greens throughout the flour.
- Knead carefully. Pour in a little drinking water at a time. Knead until the dough holds together and feels soft without sticking heavily to your hands. If it becomes wet, dust with a small amount of atta.
- Rest briefly. Cover the dough with a clean plate or cloth for around 10 minutes if convenient. This is an approximate working rest, not a tested requirement. Keep the rest short and cook promptly.
Roll and Roast Until Fully Cooked
- Roll evenly. Divide into equal balls and roll each one on a lightly floured surface. Avoid a thick centre, since that makes full cooking harder. Keep any waiting dough covered.
- Roast completely. Heat the tawa over medium heat. Place a paratha on it, cook until the underside begins to set, then turn. Apply a small amount of oil or ghee and continue turning until both sides cook evenly. Adjust the heat if the surface darkens before the centre is done.
- Check and serve. Split or cut the first, thickest paratha to inspect the centre. If dough still looks wet, sticky or floury, return it to the tawa and continue cooking. Repeat as needed and serve the batch fully cooked.
How Can You Tell When the Centre Is Cooked?
A sound moringa paratha recipe depends on a fully cooked centre, not a browned surface alone. The middle should look like cooked bread, not wet or gluey dough. Cut a sample from the thickest paratha if you are unsure, and cook it longer when needed. Surface browning by itself is not proof of complete cooking, especially with a thick or uneven round.
The FDA warns that flour is a raw food and says not to taste uncooked dough. Its flour safety guidance recommends thorough cooking. Never taste dough to check the salt, and wash hands and utensils after handling it.
Moringa Paratha Recipe: Tips for Soft Parathas
A soft result matters in this moringa paratha recipe, but full cooking matters more. Avoid adding too much flour while rolling. A firm, dry dough can produce a hard paratha. At the other extreme, a very wet dough is hard to roll and may stay thick in the middle.
If the dough feels too dry, add a few drops of water and knead again. If it feels sticky, dust lightly with atta rather than adding a large handful. A little oil in the dough is another optional texture adjustment from the original recipe.
Use a steady, moderate heat. Very high heat may blacken the outside before the centre cooks, while a barely warm tawa can dry out the bread. Keep the fully cooked parathas loosely covered for a short serving interval, but do not use wrapping as a substitute for safe storage.
Moringa Paratha Recipe for Lunchboxes and Travel
Fully cook every paratha before packing it. Do not half-roast parathas for travel because flour-based dough must cook thoroughly. Half-cooking does not establish a safe shelf life, and a second roast later cannot undo poor storage during a journey.
Let excess steam escape briefly, then place the cooked parathas in a clean food-grade container. If they will not be eaten promptly, chill them and use an insulated bag with sufficient frozen ice packs to keep them cold. Keep curd, raita and other chilled sides cold as well.
What If You Cannot Keep the Lunchbox Cold?
Do not rely on a closed dabba to keep cooked food safe throughout a hot journey. Without reliable cooling, plan to eat the parathas promptly within normal food-safety limits or choose a suitable shelf-stable alternative. Avoid promising that a homemade paratha will remain safe for an entire school or travel day.
As a general rule, refrigerate perishable cooked food within 2 hours, or within 1 hour when the surrounding temperature exceeds 32°C. These limits come from FoodSafety.gov, not a shelf-life trial of this particular paratha recipe.
Moringa Paratha Recipe: Storage and Reheating
For this moringa paratha recipe, refrigerate fully cooked leftovers promptly in a clean, shallow covered container at 4°C or colder. The US Department of Agriculture (USDA) leftovers guidance advises using refrigerated cooked leftovers within 3–4 days. That is not a guarantee that this recipe will keep its flavour or texture that long. Discard food left outside safe storage limits.
For longer storage, freeze fully cooked, cooled parathas in food-safe wrapping. Separate portions if that makes reheating easier. No recipe-specific freezer-quality duration has been tested here, so label the container with its preparation date and check quality before serving.
Reheat refrigerated or thawed leftovers thoroughly on a tawa until hot throughout. Where you can measure it, general leftovers guidance calls for 74°C in the centre. Heating a paratha until it is merely warm is not the same as thorough reheating.
Raw dough contains uncooked flour, so the safest simple meal-prep plan is to cook the parathas completely first. If you prepare dough ahead, refrigerate it promptly and cook it thoroughly; this recipe has no verified raw-dough storage duration.
Nutrition: What This Recipe Can and Cannot Claim
The moringa paratha recipe combines a whole grain ingredient with edible leafy greens. Wheat flour provides carbohydrate, while moringa leaves add plant material and their naturally occurring nutrients. However, the exact amount of iron, calcium, fibre or vitamins per paratha cannot be stated without ingredient weights, a tested yield and a nutrition calculation.
No moringa paratha recipe is a detox treatment or an immunity cure. Claims that it lowers inflammation, prevents anaemia, strengthens bones or manages blood sugar go beyond what this untested recipe establishes. It can fit into a varied diet, but it does not replace medical care or a prescribed meal plan.
People who need to manage allergies, diabetes or other health conditions should use ingredients and portions appropriate to their own dietary advice. Adjusting the side dish may also change the nutrition of the meal.
Serving Ideas and Easy Variations
Serve hot moringa parathas with plain curd, lemon pickle, dal or a mild vegetable curry. For a fuller lunch, add a fresh side prepared and stored safely. If you want a richer pairing, the site’s paneer butter masala recipe offers a separate curry option.
- Without curd: Knead with water and roast using oil for a dairy-free version, assuming all other ingredients are suitable.
- Less spicy: Reduce chilli powder and leave out fresh green chilli. This changes the heat without changing the core method.
- With carrot: Add a little finely grated, washed carrot. Drain excess moisture before rolling if the dough softens.
- With moringa powder: Start with 1–2 teaspoons of food-grade powder in place of fresh leaves. This is an untested substitution, so expect a different flavour and adjust the water gradually.
For a change of breakfast texture, try the site’s ragi dosa recipe. It is a separate dish with different ingredients and cooking needs.
Moringa Paratha Recipe: Common Mistakes and Fixes
- Raw centre, dark surface: The paratha is too thick or the heat is too high. Lower the heat, roll the next one more evenly and finish cooking the current one.
- Dough tears while rolling: Large leaf pieces or stiff stems can get in the way. Chop the tender leaves finely and remove thick stems.
- Paratha turns hard: The dough may be too dry or the bread may have spent too long on the tawa. Adjust moisture while keeping the centre fully cooked.
- Dough sticks badly: Washed leaves may have carried in extra water. Knead in a small dusting of atta and roll with a light touch.
- Lunchbox develops condensation: Do not seal steaming food and leave it warm for hours. Cool and refrigerate it promptly, then pack under safe cold conditions.
Before You Serve
This moringa paratha recipe keeps the familiar combination of atta, fresh drumstick leaves and everyday spices. The most important improvement is straightforward: cook every piece fully and never store it half-cooked for travel. Use the time and yield figures only as estimates until a documented kitchen test establishes them.
Frequently Asked Questions
Is moringa paratha healthy?
Moringa paratha can be part of a balanced meal because it combines wheat flour and edible leafy greens. Its actual nutrient content depends on ingredient amounts, cooking fat and portion size; it has no proven detox or immunity-boosting effect as a recipe.
Can I make moringa paratha without curd?
Yes. Add water gradually to make the dough and use a suitable cooking oil if you also want to avoid dairy. Check other ingredients and utensils when preparing food for someone with a milk allergy.
Can I use dried moringa powder instead of fresh leaves?
In this moringa paratha recipe, you can try food-grade moringa leaf powder, but the flavour and dough moisture will differ. The suggested 1–2 teaspoons is an untested adaptation, not a verified equivalent to one cup of fresh leaves.
How do I know the paratha is fully cooked?
Look for an evenly cooked surface and a centre without sticky raw dough. If the middle remains wet or floury when you cut a sample, return the paratha to the tawa until thoroughly cooked.
Can I half-cook moringa parathas for a journey?
No. Do not use half-cooking as a travel-storage method, since the raw flour may still contain harmful germs. Cook the parathas fully, then cool and pack them using safe temperature control.
How long can cooked parathas stay unrefrigerated?
Follow general perishable-food guidance: refrigerate within 2 hours, or within 1 hour above 32°C. These are safety limits rather than a recipe-specific promise that a paratha will keep well for that entire period.
How long will moringa parathas last in the fridge?
General cooked-leftover guidance allows 3–4 days at 4°C or colder when handled properly. No shelf-life test was done on this recipe, so use judgement on quality and discard food kept outside safe conditions.
Does moringa paratha contain gluten or dairy?
The original recipe contains gluten because it uses wheat atta. Curd and ghee add dairy when used, while optional sesame or besan may matter for other allergies. Check every ingredient before serving someone with food restrictions.