Thin Poha Chivda: Untested Recipe Trial
Thin poha chivda is a popular Diwali snack made with delicate flattened rice, roasted peanuts, curry leaves and warm spices. The aim is a light, crisp mixture that does not feel greasy or heavy. However, thin poha can scorch, break or turn soft if the roasting and cooling stages go wrong.
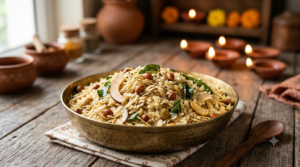
Illustrative thin poha chivda for Diwali, showing the intended roasted texture, peanuts, curry leaves and coconut. This recipe trial has not been kitchen-tested.
Recipe status: Untested trial. This article presents a proposed home-kitchen formulation, not a recipe that Bhimas Cook has cooked and verified. The ingredient quantities are starting points, while the final cooking time, cooked yield and safe keeping period remain unverified. The guide explains the cooking method and the texture cues readers can use when trying a small batch.
Thin Poha Chivda: Quick Overview
- Recipe type: Untested Diwali snack trial.
- Main ingredient: Thin flattened rice, also called thin poha or patla poha.
- Cooking method: Gentle dry roasting followed by a separate oil tempering.
- Proposed poha quantity: 300 g.
- Flavour: Mildly spicy, salty, nutty and slightly sweet.
- Texture goal: Light, dry and crisp flakes with crunchy peanuts.
- Cooking time: Not established for this formulation.
- Finished yield: Not measured.
- Safe storage duration: Not established.
The central idea is simple: roast the poha in shallow batches, prepare the seasoning separately, and combine everything without crushing the flakes. Because the recipe remains untested, individual results may vary with the pan, poha brand and cooking heat.
What Makes Thin Poha Suitable for Chivda?
Thin poha consists of flattened rice flakes that can become crisp during gentle roasting. Unlike thick poha, the flakes are delicate and require careful handling. They can also absorb moisture from the surrounding air, so the finished texture depends on more than roasting alone.
Traditional poha chivda recipes often use roasted flattened rice, peanuts, coconut, curry leaves and spices. These ingredients create a mixture of crisp and crunchy textures. The seasoning should coat the flakes lightly rather than soak them in oil.
For this trial, dry roasting offers a way to prepare the poha without deep-frying the rice flakes. The nuts and spices still need enough oil for proper cooking and flavour. Therefore, this is a roasted snack rather than a completely oil-free recipe.
Thin Poha Versus Thick Poha
| Type of poha | Suitable method | Cooking consideration |
|---|---|---|
| Paper-thin poha | Gentle dry roasting | Very fragile; can scorch quickly |
| Thin poha | Dry roasting | Needs shallow batches and gentle mixing |
| Medium poha | Roasting or frying | May require different cooking conditions |
| Thick poha | Often used for fried chivda | Cannot be substituted without changing the method |
Check the packet before starting because shops sell several grades of flattened rice. For this trial, choose flakes clearly labelled thin or paper-thin. Do not use breakfast poha that has already been soaked.
Ingredients for Thin Poha Chivda: Untested Trial
The following quantities form a proposed starting batch with 300 g of thin poha. They have not been confirmed through a Bhimas Cook kitchen test. The salt, oil and seasoning proportions may need adjustment after cooking.
| Ingredient | Proposed quantity | Purpose |
|---|---|---|
| Thin poha | 300 g | Main base |
| Raw peanuts | 60 g | Nutty crunch |
| Roasted chana dal | 30 g | Firm crunchy texture |
| Cashew nuts | 30 g | Richness |
| Dried coconut slices | 25 g | Coconut flavour |
| Neutral cooking oil | 45 ml | Tempering |
| Mustard seeds | 1 tsp | Tempering flavour |
| Cumin seeds | 1/2 tsp | Warm aroma |
| Sesame seeds | 2 tsp | Nutty flavour |
| Curry leaves | 15–20 leaves, thoroughly dried | Aroma |
| Dried red chillies | 2 | Heat |
| Turmeric powder | 1/2 tsp | Colour |
| Hing | 1/8 tsp | Savoury aroma |
| Fine salt | 1 1/4 tsp, as a starting point | Seasoning |
| Powdered sugar | 2 tsp | Sweet-salty balance |
| Amchur powder | 1/2 tsp | Tangy finish |
These measurements describe a trial formulation, not a guaranteed finished recipe. Start with a smaller batch if you are unfamiliar with thin poha. This makes it easier to judge the roasting behaviour and flavour before preparing a larger quantity.
Why Use Dried Red Chilli?
Dried red chilli adds heat without introducing the moisture associated with fresh chopped chilli. It also suits a dry snack mixture. However, the quantity of chilli should reflect your family’s spice preference.
Fresh green chillies appear in many traditional chivda recipes. If you choose to include them, cook them thoroughly in the tempering. Their addition changes the formulation and may affect storage behaviour, which remains unverified here.
How to Roast Thin Poha Chivda Gently
Thin poha chivda needs careful roasting because paper-like rice flakes respond quickly to heat. Use a broad, heavy-bottomed kadai or frying pan. Work with small portions so the flakes can heat more evenly.
- Inspect the poha. Remove visible foreign matter, then gently sieve away loose powder and very small broken pieces. Use dry utensils.
- Heat the pan. Place a clean, dry kadai over low heat. Avoid high heat because the thin flakes can brown before they dry evenly.
- Add a shallow layer. Begin with a portion of the 300 g poha. Keep the flakes spread out rather than piling them deeply.
- Move gently. Lift and turn the flakes with a broad spatula. Avoid pressing them against the pan because they may break.
- Watch the texture. Continue roasting carefully while checking for dry, crisp flakes. Do not use browning as the main sign.
- Remove the batch. Transfer the roasted poha to a clean, dry tray. Repeat with the remaining portions.
This trial has no verified roasting time. Other poha chivda recipes offer approximate timings, but they cannot establish the exact result in your kitchen. Pan thickness, flame strength and batch depth all influence cooking.
How Can You Recognise Crisp Roasted Poha?
A cooled flake can help you assess texture. It should feel light, dry and brittle rather than soft or leathery. However, this test concerns crispness only; it does not establish microbiological safety or storage life.
Take care when checking hot food. Allow a small sample to cool before touching or tasting it. Keep roasting gently if the remaining flakes seem underdone, but avoid excessive heat that could burn them.
Making the Peanut and Curry Leaf Tempering
The tempering gives roasted chivda much of its flavour. It also brings together ingredients that cook at different rates. Therefore, prepare everything before heating the oil and keep the flame controlled.
- Prepare the ingredients. Measure the nuts and spices. Wash curry leaves if needed, then dry them thoroughly before frying.
- Heat the oil. Add the proposed 45 ml oil to a clean kadai over medium-low heat.
- Add mustard and cumin. Allow the seeds to splutter carefully without burning.
- Cook the peanuts. Add raw peanuts and stir until properly roasted. Their colour and texture should indicate that they have cooked through.
- Add the other crunchy ingredients. Include cashews, roasted chana dal, dry coconut and sesame seeds in stages, watching their browning.
- Finish with aromatic ingredients. Add dried chilli and thoroughly dried curry leaves. Keep clear of splattering oil.
- Lower the heat. Add turmeric and hing, stirring briefly so the powders do not burn.
Do not treat the order as a substitute for checking each ingredient. Peanuts need sufficient cooking, while cashews and sesame can brown quickly. If one ingredient begins burning, lower the heat rather than continuing at the same flame.
Why Dry Curry Leaves Before Frying?
Water on curry leaves can cause hot oil to splatter. Thorough drying helps reduce this hazard and limits extra moisture entering the mixture. Even dry leaves can splutter, so add them carefully and keep your face away from the pan.
Use a long-handled spatula and avoid overcrowding the kadai. If you are new to frying tempering ingredients, work with a modest amount rather than a large batch.
Combining the Poha and Seasoning
Once the tempering ingredients are cooked, reduce the heat and add the roasted poha gradually. Fold the mixture with a broad spatula instead of stirring forcefully. The goal is an even coating that leaves most flakes intact.
Add the proposed salt, powdered sugar and amchur, then mix gently. Fine powders tend to spread more easily across thin flakes than large crystals. Taste only once the food has cooled enough to eat safely.
Seasoning is a personal choice, so a trial batch may need more salt, less sugar or a different chilli level. Make modest adjustments because strong spices can quickly dominate a light rice-flake mixture.
Why Does the Seasoning Collect at the Bottom?
Very coarse salt, uneven oil coating and rough mixing can leave seasoning in patches. Use fine salt and powdered sugar, then fold carefully through the mixture. A wide pan also gives the poha more room to move.
If the bottom contains many broken flakes, the mixture may have suffered from excessive stirring. Handle the remaining poha more gently rather than trying to mix harder.
Why Does Thin Poha Chivda Lose Its Crispness?
Thin poha chivda can lose its crisp texture when moisture enters the flakes or when the roasting is uneven. It may also become oily if the tempering is poorly balanced. These are quality problems that readers can assess while cooking.
| Texture problem | Possible cause | Prevention |
|---|---|---|
| Soft flakes after roasting | Uneven heating or insufficient roasting | Roast gently in shallow batches |
| Broken flakes | Forceful stirring | Use a broad spatula and lift gently |
| Scorched taste | Excessive heat | Lower the flame and avoid browning |
| Greasy texture | Heavy or uneven oil coating | Measure oil and mix gradually |
| Clumped seasoning | Coarse powders or poor mixing | Use fine seasoning and distribute evenly |
These observations help improve the eating texture, but they do not prove food safety. A snack can smell pleasant and remain crisp while still having an unknown safe storage period. Therefore, never use crispness alone to decide whether an older batch is safe.
Can Soft Poha Chivda Become Crisp Again?
Gentle reheating may help with a texture problem caused solely by moisture absorption. However, reheating is not a reliable way to make improperly stored or potentially contaminated chivda safe. If you cannot establish that the food remained safe, discard it.
For a freshly prepared batch that simply needs further roasting, return a small portion to a clean, dry pan over low heat. Handle the flakes carefully because they can burn or fracture. Do not attempt to rescue food that shows spoilage or has an uncertain storage history.
The safest way to address texture is during initial preparation. Roast evenly, keep ingredients dry and cool the finished mixture correctly. Those steps reduce avoidable problems before storage begins.
Thin Poha Chivda Storage: What Is Actually Known?
The safe keeping time for this particular thin poha chivda formulation has not been established. No kitchen trial or food-safety assessment supports a specific number of days or weeks. Consequently, this guide does not recommend a fixed room-temperature storage duration.
Dry snack mixtures can be affected by moisture, heat, handling and ingredient quality. Oil and nuts may also develop rancid flavours over time. An airtight container helps protect texture and limits exposure, but it does not establish food safety or guarantee shelf life.
Practical Storage Precautions
- Allow freshly prepared chivda to cool completely before placing it in a container.
- Use a clean, dry, food-grade container with a well-fitting lid.
- Keep hands, serving spoons and preparation surfaces clean.
- Prevent contact with water, steam and damp utensils.
- Avoid unnecessary exposure to heat and direct sunlight.
- For this untested formulation, prepare a modest amount for prompt consumption rather than assuming it can be stored for weeks.
- Discard food if spoilage appears or its storage safety is uncertain.
Cooling before sealing helps prevent condensation, while suitable containers protect the food from environmental moisture. Neither measure proves that homemade chivda remains safe for a particular period. A pleasant smell, dry appearance and good crunch cannot rule out every food-safety hazard.
The Food Safety and Standards Authority of India (FSSAI) provides general information on safe food handling. Readers can also consult FoodSafety.gov’s FoodKeeper resources and USDA guidance on shelf-stable foods. These resources offer broader storage principles, not a validated shelf life for this specific recipe.
Preparing Thin Poha Chivda for Diwali
Diwali kitchens often prepare several sweets and savoury snacks, so managing the order of cooking matters. This chivda trial works best when the ingredients are measured before the pan heats. Small roasting batches also give home cooks more control.
Arrange the cleaned poha, peanuts, cashews, dried coconut and spices in separate bowls. Keep a broad tray ready for cooling, along with clean, dry serving utensils. This reduces the need to leave a hot pan unattended.
Because the recipe’s safe keeping time remains unknown, avoid making a large batch far ahead of the festival based on assumed shelf life. A smaller preparation closer to serving is a more cautious choice. Handle any leftovers according to sound food-safety practices without assuming an unverified number of safe days.
For a festive menu, pair the chivda with Bhimas Cook’s Diwali sweets recipes. Readers exploring another savoury preparation can also see the ragi ribbon pakoda guide, which discusses a separate trial method.
Common Mistakes When Roasting Thin Poha Chivda
The first mistake is using high heat because the flakes can brown before roasting evenly. Low heat gives the cook more control. Still, watch the pan closely rather than assuming low heat prevents burning.
The second mistake is crowding the kadai. Thick layers make it harder to expose all the flakes evenly to the hot surface. Roast smaller portions and transfer them to a tray before adding the next batch.
Another mistake is washing thin poha for a dry-roasted recipe. Unlike soft breakfast poha, this method does not call for soaking. Use dry, clean flakes and suitable handling instead.
Wet curry leaves create another problem because water can splatter in hot oil. Dry the leaves thoroughly and add them cautiously. Keep children away from the active frying area.
Finally, avoid closing the storage container while the mixture is warm. Condensation may affect texture and handling conditions. Complete cooling is useful, although it does not validate storage safety.
Flavour Variations Worth Considering
Once familiar with the basic roasting method, home cooks can explore different flavour combinations. However, each change creates a different formulation. The quantities and storage behaviour cannot automatically be assumed to match this untested version.
Maharashtrian-Style Sweet and Spicy Chivda
A Maharashtrian-style variation may use a noticeable sweet-salty balance with peanuts, curry leaves and turmeric. Some versions add raisins or additional sugar. Adjust cautiously because the sweetness can dominate delicate poha.
South Indian Curry Leaf Chivda
For a stronger South Indian flavour, emphasise curry leaves, mustard seeds, dried chilli and hing. Sesame can also add a roasted note. Keep the spice powders light so the poha flavour remains clear.
Nut-Free Variation
Peanuts and cashews can be omitted for a different snack, although the final flavour and texture will change. For allergy management, check every packaged ingredient and prevent cross-contact. Merely removing visible nuts does not make a preparation safe for someone with a serious nut allergy.
How Thin Poha Chivda Differs From Soft Atukulu
Flattened rice appears in both crisp snacks and soft preparations, but the cooking methods differ. Thin chivda relies on dry heat and careful tempering. Soft atukulu dishes may use water or syrup to change the texture deliberately.
Bhimas Cook’s atukula prasadam with jaggery illustrates the softer approach. That contrast explains why the same general ingredient can produce very different results.
For chivda, avoid copying soaking instructions from a soft-poha recipe. Also avoid assuming that thick poha will roast the same way as paper-thin flakes. Choose the grade to match the intended cooking method.
Thin Poha Chivda: Final Notes
This thin poha chivda recipe trial provides a starting formulation and practical roasting guidance, but it is not a tested final recipe. The proposed ingredients may require adjustment, and no measured yield or safe storage duration is available.
Focus on using thin flakes, managing heat, cooking the tempering ingredients properly and preventing unnecessary moisture. Prepare a manageable amount for prompt consumption. Most importantly, do not mistake a crisp texture or pleasant aroma for proof that stored food remains safe.
Frequently Asked Questions About Thin Poha Chivda
Which poha is best for roasted chivda?
Thin or paper-thin flattened rice suits the gently roasted version because the flakes can become crisp without deep frying. The exact method depends on the product and pan. Thick poha may require a different cooking approach.
Should I wash thin poha before making chivda?
No soaking or washing step is included in this dry-roasted trial. Keep the flakes dry and remove visible debris or loose powder as appropriate. Added moisture works against the intended crisp texture.
How long should thin poha be roasted?
This trial does not have a verified roasting time. Roast gently while watching texture and avoiding scorching. Use a cooled sample to assess crispness, but do not treat that test as proof of food safety.
Why is homemade chivda sometimes soft?
Uneven roasting and moisture exposure are common reasons for a soft texture. Crowded pans, damp tempering ingredients and humid air may all contribute. Adjusting the preparation method can improve texture without establishing a longer safe storage period.
Can I make thin poha chivda without deep frying?
Yes. This proposed method dry-roasts the rice flakes and prepares the tempering separately with oil. Peanuts and other ingredients still need suitable cooking. It is not an oil-free recipe.
How much chivda does 300 g of poha make?
The finished yield of this untested formulation is unknown. Peanuts, coconut, oil and other ingredients add to the starting weight. The actual cooked yield cannot be stated accurately without weighing a completed batch.
How long can homemade poha chivda be stored?
No verified safe storage duration is available for this recipe trial. Storage safety depends on preparation, ingredients, contamination risks and storage conditions. An airtight container does not prove a particular shelf life, and smell or crispness cannot establish safety.
Can I prepare poha chivda several days before Diwali?
This untested recipe does not support a specific advance-preparation interval. For a cautious approach, prepare a modest quantity closer to serving rather than relying on an assumed keeping time. Follow general food-safety practices when handling and storing it.
Can I restore crunch to stored chivda by roasting it again?
Reheating may change texture, but it cannot reliably make contaminated or improperly stored food safe. If the storage history is uncertain, discard the chivda. Do not use re-roasting as a substitute for safe food handling.
Is this a kitchen-tested Bhimas Cook recipe?
No. It is explicitly an untested recipe trial with proposed quantities and preparation steps. The exact cooking time, measured yield and safe keeping period have not been established through a completed kitchen test.