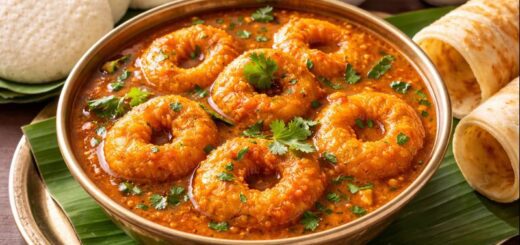
Medu Vada Recipe Without Frying Best Easy South Indian
Medu Vada Recipe Without Frying Easy Cooking Process Home
Medu Vada Recipe Without Frying is a healthier take on the classic South Indian breakfast favorite. Traditionally a deep-fried lentil fritter called Medu Vada, this version lets you enjoy all the flavors and soft texture without the excess oil and calories from deep frying. I personally experimented with non-fried methods and found that the texture stays soft and delicious when cooked properly.
Recipe Card
| Prep Time | 15 mins (plus soaking) |
|---|---|
| Soaking Time | 4–6 hrs |
| Cook Time | 20 mins |
| Servings | 6 vadas |
| Difficulty | Moderate |
Ingredients
- Urad Dal (Skinned Black Gram) – 1 cup (200 g), soaked
- Water – as needed for grinding
- Green Chillies – 2, finely chopped
- Fresh Curry Leaves – 8–10 leaves, finely chopped
- Ginger – 1 tsp, grated (optional)
- Salt – 1 tsp (adjust to taste)
- Cumin Seeds – 1 tsp
- Oil – 1–2 tsp (for greasing pan)
Step-By-Step Instructions
1. Soaking Dal
Rinse 1 cup of urad dal under running water until water runs clear. Cover with fresh water and soak for at least 4–6 hours at room temperature to soften the dal. Proper soaking helps create a light, airy batter.
2. Grinding the Batter
Drain the soaked dal and add it to a blender or wet grinder. Add a splash of water as needed and grind into a smooth, thick batter — not too runny, not too stiff. A batter consistency similar to pancake batter works best. Understanding Medu Vada Recipe Without is essential.
3. Seasoning the Batter
Transfer the batter to a bowl. Add green chillies, curry leaves, grated ginger, cumin seeds, and salt. Mix well using a spoon. Whisk lightly for 1–2 minutes to add air into the batter — this helps make soft vadas.
4. Heating the Pan
Place a non-stick or cast-iron pan over medium heat. Add 1–2 tsp oil and spread to grease the bottom of the pan. Keep the heat at medium-low so the vadas cook slowly and don’t burn.
5. Shaping & Cooking Vadas
Dip a spoon in water and scoop a tablespoon of batter. Drop batter into the hot pan, creating small round shapes. You can flatten them slightly with the back of the spoon. Space them evenly so they don’t touch. This relates to Medu Vada Recipe Without.
- Cook one side for 6–8 mins until golden brown.
- Flip and cook the other side for 5–7 mins.
- Press gently so the batter cooks through entirely.
6. Serving
Once both sides are golden and cooked through, transfer to a serving plate. Serve hot with fresh sambar or coconut chutney.
Nutrition Information (Per Serving)
| Calories | ~90–130 kcal |
|---|---|
| Protein | 5–7 g |
| Fat | 1–3 g |
| Carbohydrates | 12–18 g |
| Fiber | 1–3 g |
Note: Traditional deep-fried Medu Vada contains approximately 150–190 calories due to oil absorption, so this non-fried version gives a lighter alternative.
Pro Tips From Personal Cooking Experience
- When I visited a South Indian food festival, I noticed vendors tossing batter into an appe pan instead of frying — resulting in vadas with a similar shape. You can use an appe pan to make mini medu vada bites too.
- Always keep your batter slightly aerated by whisking before cooking; this creates fluffiness.
- If batter seems too thick, add a tablespoon of water — but avoid too much water or the vadas won’t set properly.
- Cook on medium-low heat to ensure interior cooks without burning the exterior.
Chef’s Notes
Substitutions
- Air Fryer Version: You can shape medu vada and air fry at 180°C (350°F) for 12–15 mins, flipping halfway.
- Paniyaram Pan: A traditional South Indian paniyaram pan can make bite-sized vadas without frying.
- Add Veggies: Finely grated carrot or spinach adds color and nutrients.
Storage Tips
Store leftover cooked vadas in an airtight container in the fridge for up to 2 days. Reheat on a pan or in an oven to crisp them slightly. Learn more about Medu Vada Recipe Without.
Frequently Asked Questions
Can I make this Batter Ahead Of Time?
Yes. You can soak and grind batter the night before. Store in the refrigerator up to 12 hours, then season and cook when needed.
What Can I Serve With Non-Fried Medu Vada?
Serve with hot sambar, coconut chutney, or tomato chutney for a complete South Indian breakfast. The tangy sambar complements the soft vada perfectly.
Is This Recipe Healthy For Diet Plans?
This non-fried version significantly reduces fat and calories compared to the deep-fried classic. It retains plant-based protein from urad dal and makes a lighter breakfast option.
Why Choose Medu Vada Recipe Without Frying?
Swapping deep-frying for pan-cooking or alternative methods reduces calories and fat without sacrificing the traditional taste you crave. I personally recommend this when you want a guilt-free breakfast that pairs well with traditional accompaniments.


