Air Fryer Medu Vada: Batter, Timing and Crispness Guide
Air fryer medu vada starts with soaked urad dal, a thick airy batter and a little oil on the surface. The tricky part is knowing when the centre has cooked, because a golden crust alone does not tell you. This guide gives you a practical method and clear checks, without promising an untested cooking time.
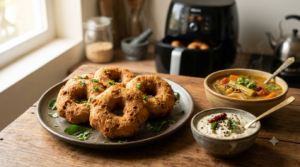
Air fryer medu vada made with urad dal batter, served with coconut chutney and sambar for a classic South Indian breakfast.
Recipe testing status: Bhimas Cook has not supplied a documented kitchen trial for this version. The ingredient amounts, preparation times, cooking time and yield below are untested starting estimates, not verified results from a measured batch. If you make the recipe, check the centre of a vada before serving.
Air Fryer Medu Vada at a Glance
- Main ingredient: dehusked urad dal (black gram), not sabudana or chana dal.
- Soaking: about 4–5 hours, a commonly used guide rather than a timed trial here.
- Air fryer setting to try: 180°C (about 356°F), subject to your appliance instructions.
- First check: turn the vadas around the halfway point; check the centre around the 15-minute mark.
- Total cooking time: untested for this batter and air fryer; continue in short intervals as needed.
- Expected yield: untested; the number depends on how large you shape each vada.
The 180°C and 15-minute reference comes from SharkNinja India’s air fryer medu vada method. That recipe uses a different amount of prepared batter, so its timing does not validate the quantities on this page. Its summary also says 10 minutes while its actual directions say 15 minutes, another reason to inspect rather than trust a headline time.
Recipe Card: Proposed Ingredients and Timing
| Detail | Proposed guide | Status |
|---|---|---|
| Dal soak | About 4–5 hours | Reference range; not timed here |
| Hands-on prep | Allow time to grind, beat and shape | Not measured |
| Air fryer setting | 180°C | Manufacturer recipe reference |
| Cooking checkpoint | Check near 15 minutes | Not a guaranteed finish time |
| Yield | Varies with portion size | Not measured |
| Difficulty | Shaping needs practice | Editorial guidance |
These details replace the older card’s fixed claim of 15–18 minutes and eight vadas. Neither figure had a documented home-kitchen result. Use the clock to decide when to inspect the food, not when to assume it is ready.
Ingredients for Air Fryer Medu Vada
The following amounts preserve the original post’s basic recipe. Treat them as a proposed starting mix until Bhimas Cook records a weighed and timed trial. The recipe also works without onion if you prefer a simpler seasoning.
- 1 cup dehusked urad dal, dry measure — proposed amount, untested in this recipe.
- 3–4 green chillies, finely chopped — proposed amount; reduce for less heat.
- Up to 1/2 cup finely chopped onion, optional — proposed amount; extra onion adds moisture.
- 1 tablespoon chopped coriander leaves — proposed amount.
- 1 teaspoon cumin seeds — proposed amount.
- 1/2 teaspoon crushed black pepper — proposed amount.
- 1/4 teaspoon asafoetida (hing) — proposed amount; check the label for wheat if needed.
- Up to 1 teaspoon salt, adjusted to taste after cooking — proposed amount.
- Up to 2 tablespoons rice flour, optional if the batter is too loose — proposed maximum, not a mandatory addition.
- Fresh water, added a little at a time only as needed to grind.
- Oil for lightly brushing the basket and vadas; the earlier 1–2 teaspoon total is untested.
Use clean utensils and a mixer grinder or wet grinder. A bowl, spoon and a small plate also help when you shape the batter. Since the final batch size is unknown, do not divide these ingredients by a claimed number of vadas to calculate nutrition.
How to Make Air Fryer Medu Vada Step by Step
This is a practical starting sequence, not a first-hand test report. Keep the vadas a similar size within each batch so you can compare their progress. If the shapes collapse before cooking, fix the batter rather than extending the timer.
- Wash and soak the dal. Rinse the urad dal until the water looks clearer. Cover it with plenty of fresh water and soak for about 4–5 hours. Drain the dal well before grinding, since standing water can make the batter runny.
- Grind with minimal water. Add the drained dal to a suitable grinder. Add small splashes of water only when the blades need help. Aim for a thick, smooth mixture that holds a mound on a spoon rather than flowing like dosa batter.
- Beat the batter. Stir or whisk it briskly to work air into the mixture. A light batter gives you a better starting point than a heavy paste. The old post’s 3–4-minute beating time was not supported by a trial, so judge the texture rather than timing the whisk.
- Fold in the seasoning. Mix in the chillies, coriander, cumin, pepper, hing and salt. Add onion if using it. If the batter turns too loose, try a small amount of the optional rice flour and reassess its shape.
Food safety: Do not taste raw batter. Check seasoning only after cooking a small sample.
Shaping and air frying the batter
- Prepare the appliance. Set the air fryer to 180°C. Preheat only if your specific appliance manual recommends it. Lightly oil an approved basket or tray, keeping the airflow openings clear.
- Shape the vadas. Dampen or lightly oil your hands. Form a small ring with a hole in the middle, then transfer it carefully to the basket. A lightly oiled spoon or small flat surface may help if the batter sticks.
- Cook in a single layer. Leave space between the rings and lightly brush their tops with oil. Start cooking at 180°C. Check and gently turn them around the halfway point of the manufacturer’s 15-minute reference, if they hold together.
- Check the centre before serving. Inspect a vada around 15 minutes, then cut it open. The centre should look set and cooked, without glossy or gummy raw batter. If it is still wet, return the vadas for short additional intervals and recheck.
Do not add the old recipe’s automatic high-temperature finishing step. A change to 200°C may brown the outside before the middle sets, especially with large rings. Exact extra minutes remain untested for this batter.
How Long Does Air Fryer Medu Vada Take?
There is no verified universal cooking time for the proposed batter on this page. SharkNinja lists 180°C for 15 minutes in its published air fryer medu vada directions. However, the same source uses 200–220 g of ready batter, while the Bhimas Cook formula starts with a cup of dry dal. Treat 15 minutes as an inspection point, not a guaranteed completion time.
| Timing claim | Where it came from | How to use it |
|---|---|---|
| 15–18 minutes | Previous Bhimas Cook recipe card | Removed as an untested finished time |
| 8 + 8–10 minutes | Previous cooking steps | Removed as a conflicting fixed instruction |
| Optional 2–3 minutes at 200°C | Previous finishing suggestion | Removed; no trial supports it |
| 180°C, 15 minutes | SharkNinja recipe directions | Reference checkpoint for a different batter amount |
Air fryer models move hot air differently. Ring thickness, batter moisture and the number of vadas in the basket also affect cooking. Therefore, record the actual total time for your appliance instead of copying one as a universal figure.
How to Tell If the Centre Is Cooked
Cut open a representative vada from the thickest part of your batch. A cooked centre should appear set throughout, not glossy or sticky with uncooked batter. Surface colour can help, but it cannot replace a centre check. If the inside is still wet, continue cooking and check again before serving.
Keep the first test vada small enough to inspect easily. Also look for a firm ring that lifts without smearing. If the outside browns fast while the middle stays raw, make the next batch smaller or thinner. Do not assume that adding more oil solves a raw centre.
Air Fryer Medu Vada Troubleshooting
| Problem | Likely cause | Try next |
|---|---|---|
| Vadas flatten | Too much water or wet onion | Drain well; use less grinding water |
| Sticks to basket | Basket needs light oil or food moved early | Use an approved lightly oiled surface |
| Brown outside, wet inside | Rings too thick or heat too strong | Shape smaller and check the cut centre |
| Hard or dense | Heavy batter or overcooking | Grind finely, aerate and check earlier |
| Patchy browning | Crowded basket or uneven airflow | Leave gaps and turn gently |
| Breaks when flipped | Soft batter or moved too soon | Let the surface set before turning |
Change one factor per batch when you troubleshoot. For example, reduce the grinding water without also changing the temperature. That makes the result easier to interpret, even before a formal recipe trial is complete.
Should You Use Parchment Paper?
Check your model’s manual before adding any liner. Philips advises against baking paper in its Airfryer models because it can block airflow or lift toward the heating element. Some other manufacturers allow particular liners, so their instructions take priority. Never preheat with loose paper inside the basket.
A lightly greased, manufacturer-approved basket is the simpler default. If your appliance permits a liner, use one that suits its shape and temperature limits. Keep it weighed down with food, and avoid blocking the air channels. That matters when you want even browning around a delicate ring.
Medu Vada, Masala Vada and Sabudana Vada Are Different
Medu vada uses a smooth urad dal batter and usually has a hole in the centre. Masala vada uses a coarser chana dal mixture, so its texture and cooking behaviour differ. Sabudana vada uses soaked tapioca pearls, often with potato and peanuts. Their timing should not move from one recipe to another without testing.
For those distinct snacks, see our air fryer masala vada and air fryer sabudana vada guides. This distinction also corrects an older cached version of this page that described sabudana instead of urad dal.
What We Can and Cannot Say About Oil and Calories
Air frying uses a light coating of oil in this proposed method rather than immersing the vadas in a pan of oil. That describes the technique; it does not establish how many calories the finished food contains. Oil uptake, ring size and ingredient weights would need measurement before a reliable comparison.
The previous per-vada calorie, protein, fat, carbohydrate and sodium figures have therefore been removed. We also cannot promise a particular percentage reduction from deep frying. If you need a nutrition estimate, first weigh the ingredients, measure the oil actually used and record the number and weight of cooked vadas. Any resulting calculation would still be an estimate, not a laboratory test.
Serving, Cooling and Reheating
Serve the vadas after checking that they have cooked through. Coconut chutney and sambar are familiar partners because the soft dips contrast with a firmer vada crust. For a home-style side, try our sambar made with sambar powder.
If you are preparing a broader air-fryer breakfast, our air fryer chapati recipe explains the separate flatbread method. Cook each dish using its own instructions rather than assuming the same temperature or timing.
If you have leftovers, cool them promptly in shallow containers and refrigerate them within two hours. In very hot conditions above 32°C, use a one-hour limit. These are general FoodSafety.gov food-handling guidelines, not a shelf-life trial for this particular vada recipe.
Reheat cooked leftovers until hot throughout. The US Department of Agriculture advises 74°C (165°F) for reheated leftovers. The old page’s fixed 3–4-minute reheat claim lacked a recorded test, so follow your appliance and check the food rather than relying on that number.
What to Record in a Real Kitchen Trial
A good trial does more than report that the vadas looked golden. To validate this air fryer medu vada recipe, the cook needs the exact appliance model, ingredient weights and cooked yield. Each batch should also have a recorded temperature, flip point, finish time and centre texture.
- Write down the model and capacity of the air fryer.
- Weigh the dry urad dal, the added water and all seasonings.
- Count the shaped rings and record their approximate size.
- Note whether the basket was preheated and whether a liner was used.
- Record the temperature, the time of each check and the final cooking time.
- Cut open one of the thickest vadas, photograph the crumb and note its texture.
- Measure the cooked batch weight before calculating any per-piece estimate.
Until that evidence exists, this page should keep the quantities, yield and cook time marked untested. A repeat batch would help show whether the result works consistently. Do not turn a single successful attempt into a guaranteed time for every air fryer.
Before You Serve
The useful starting point is simple: a thick urad dal batter, well-spaced rings and an 180°C reference setting. Check the cooking progress rather than treating a published time as a promise. Most of all, cut open a vada before serving, since surface colour alone cannot confirm the middle is ready.
Air fryer medu vada may take some adjustment for your basket and batter. Once you have weighed and timed a real batch, the recipe card can be updated with meaningful results. Until then, the trial status stays visible.
Air Fryer Medu Vada: Frequently Asked Questions
Can I make medu vada in an air fryer without deep frying?
Yes. Shape the urad dal batter into rings and cook them with light surface oil in a suitable air fryer. However, the texture may differ from deep-fried medu vada, and this page has no documented kitchen trial. Check the centre before you serve the batch.
What temperature should I try for air fryer medu vada?
Start with 180°C if your appliance supports it. SharkNinja uses that temperature for a different prepared-batter recipe. The correct finish time for this page’s proposed ingredient amounts remains untested, so inspect the food and adjust carefully.
How many minutes should I cook medu vada?
Use around 15 minutes as an inspection checkpoint, not a fixed completion time. Check the vadas earlier when you turn them, then cut one open near that point. If the centre looks wet, continue in short intervals until it is cooked.
Why does my medu vada turn flat?
A loose batter may spread before its surface sets. Drain the dal thoroughly and limit the water added during grinding. If you use onions, chop them finely and avoid excess moisture. Also try shaping smaller rings rather than adding flour indiscriminately.
Can I leave onion out of the batter?
Yes. Onion is optional in this recipe. You can use green chillies, coriander and cumin for flavour instead. Removing onion also removes one possible source of extra water, although the final texture still depends on the batter.
Is rice flour necessary for air fryer medu vada?
No. Keep it optional while the recipe remains untested. Small amounts can help a batter that struggles to hold its shape, but too much may change the texture. Start with properly drained dal and minimal grinding water.
Can I use baking paper in the air fryer?
Only if your model’s manufacturer allows it. Philips advises against baking paper in its Airfryers, so do not assume every basket is the same. Never place loose paper in a preheating air fryer, because airflow may lift it into the heater.
How many vadas does one cup of urad dal make?
This page does not have a measured yield. The number changes with portion size and the amount of water added during grinding. Count and weigh a finished trial batch before you publish a reliable serving number or per-vada nutrition.
Is air fryer medu vada lower in calories than fried medu vada?
This recipe has no measured calorie comparison. Brushing food with oil is different from deep frying, but that fact alone cannot tell you the calorie savings. The previous numerical nutrition and calorie-reduction claims were removed because their method was not documented.