Karam Gavvalu Recipe: Crispy Andhra Wheat Flour Shells
This Karam Gavvalu Recipe uses whole wheat flour and semolina instead of maida, so the shells stay crunchy for days without turning greasy. Gavvalu means “shells” in Telugu, and the spicy version carries chilli and pepper right inside the dough. Most guides skip the one detail that decides the outcome, so we will fix that first.
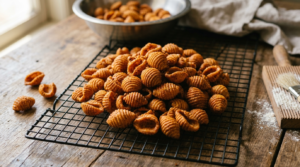
Freshly fried karam gavvalu — ridged wheat flour shells cooling on a wire rack before they go into the jar.
The mistake is the size of the dough ball. Pinch off a piece too large and the shell unrolls in the oil. Pinch off a marble-sized piece and it curls into a tight, ridged shell every single time. Everything else in this Karam Gavvalu Recipe follows from that.
Karam Gavvalu Recipe at a Glance
- Flour base: whole wheat atta with semolina for bite
- Dough ball size: marble-sized, roughly one level teaspoon
- Frying temperature: medium-low, around 160–170°C
- Total time: about 1 hour 15 minutes including a 25-minute rest
- Yield: roughly 70–90 small shells, or six generous servings
- Shelf life: 10–12 days in a truly airtight jar
| Stage | Time |
|---|---|
| Mixing and kneading | 10 minutes |
| Dough rest | 25 minutes |
| Shaping the shells | 20–25 minutes |
| Heating oil and frying | 25 minutes |
| Total | About 1 hour 15 minutes |
Many versions of this snack quote 40 minutes of prep. That figure quietly leaves out shaping, which is the slow part. Budget the full hour and a quarter, because rushing the shells is exactly what breaks them.
Karam Gavvalu vs Teepi Gavvalu: What Actually Changes
Both snacks share the same shell shape, yet they are built differently. Karam gavvalu carries the spice inside the dough. Teepi gavvalu is fried plain, then coated in jaggery or sugar syrup afterwards.
| Point | Karam (spicy) | Teepi (sweet) |
|---|---|---|
| Where flavour sits | Inside the dough | In the outer syrup coat |
| Dough texture | Stiff, slightly coarse | Softer, smoother |
| Extra step | None after frying | Syrup at one-string stage |
| Stays crisp for | 10–12 days | 5–7 days, syrup softens it |
| Best paired with | Chai or filter coffee | Served as a festive sweet |
If you want the sweet version instead, our wheat flour gavvalu with jaggery syrup covers that method separately. The two recipes are not interchangeable, because the sweet dough is deliberately softer.
Ingredients for This Karam Gavvalu Recipe
These quantities make about six servings. Measure the flour first, then adjust water slowly, since atta brands absorb liquid differently.
- Whole wheat flour (atta) — 2 cups, roughly 240 g
- Semolina (sooji or rava), fine — ½ cup
- Red chilli powder — 1 teaspoon, or more if you like heat
- Black pepper powder — 1 teaspoon
- Carom seeds (ajwain) — 1 teaspoon, lightly crushed
- Salt — 1 teaspoon
- Hot oil for the dough — 2 tablespoons
- Water — about ¾ cup, added a little at a time
- Oil for deep frying — 500 ml or enough for a 5 cm depth
Why Wheat Flour and Semolina Work Together
Atta alone gives a dense shell that tastes heavy. Semolina breaks that density because its coarse grains create tiny gaps as the shell fries. Those gaps are what you hear as crunch. Keep the ratio near four parts atta to one part semolina.
The 2 tablespoons of hot oil matter just as much. Telugu cooks call this the moyam, and it coats the flour so the shell turns flaky rather than hard. Skip it and the shells come out tough, no matter how well you fry them.
How to Make This Karam Gavvalu Recipe Step by Step
Step 1: Mix and Knead the Dough (10 minutes)
Combine the atta, semolina, chilli powder, pepper, ajwain and salt in a wide bowl. Heat the 2 tablespoons of oil until it shimmers, then pour it over the dry mix. Rub it in with your fingertips until the flour feels like damp sand.
Now add water in small splashes. Knead for about five minutes into a firm dough. It should be stiffer than chapati dough, because a soft dough will not hold ridges. Cover the bowl and rest the dough for 25 minutes so the semolina hydrates fully.
Step 2: Shape the Shells on a Gavvalu Peeta (20–25 minutes)
The traditional tool is a gavvalu peeta, also called a gavvalu chekka. It is a small serrated wooden board, and Andhra kitchens have kept one for generations. Press a marble-sized ball onto the ridges with your thumb, then push forward so the dough curls onto itself.
No board at hand? A clean fork works, although the ridges come out shallower. Rest the dough ball on the back of the fork tines and roll it down with your thumb. Keep the shaped shells under a damp cloth while you work, since dry edges crack during frying.
Step 3: Heat the Oil Correctly (5 minutes)
Pour oil into a kadai to a depth of about 5 cm. Heat it on medium until a scrap of dough rises steadily within four or five seconds. If it browns instantly, the oil is too hot. Pull the pan off the flame for a minute before you start.
Step 4: Fry in Small Batches (about 20 minutes)
Slide in 10 to 12 shells at a time. Wait roughly 30 seconds before you stir, otherwise they stick to each other. Each batch needs four to five minutes on medium-low heat until the shells turn deep golden.
Listen rather than watch. The bubbling slows noticeably when the moisture has cooked off, and that sound is your real signal. Lift the shells onto a wire rack instead of paper, because trapped steam softens the underside.
The Shaping Mistake That Ruins Most Batches
Several recipes online tell you to pinch off “lemon-sized” portions. That instruction is simply wrong for gavvalu. A lemon-sized ball flattens into a thick disc, and it will not curl into a shell at all.
Use a marble or a small gooseberry as your mental reference. One level teaspoon of dough is about right. Small shells also fry evenly, whereas thick ones brown outside while the centre stays doughy. This single correction fixes most failed batches.
Can You Air Fry This Karam Gavvalu Recipe?
You can, but the result is honestly different. Air-fried gavvalu come out harder and drier, closer to a baked biscuit than a fried shell. Deep frying pushes oil into the ridges, and hot air alone cannot do that.
If you still want to try it, toss the shaped shells in one tablespoon of oil first. Air fry at 180°C for 12 to 14 minutes, shaking the basket twice. Expect a firmer bite and pale colour. Anyone promising identical results has not tested both side by side.
Frying Oil Safety and Reuse
Deep frying at home deserves a little caution. Keep children away from the kadai, and never add wet shells to hot oil. Dry your slotted spoon before each batch, since a single water droplet causes violent spattering.
Reused oil is the bigger question. The Food Safety and Standards Authority of India (FSSAI) has fixed a limit of 25% total polar compounds, beyond which vegetable oil should not be used. Those compounds build up each time oil is reheated.
Practically, strain the oil once it cools and reuse it two more times at most. Discard it when it darkens, smells sharp, or foams on heating. A Karam Gavvalu Recipe fried in tired oil tastes stale, however carefully you shaped the shells.
Troubleshooting Your Karam Gavvalu Recipe
| Problem | Likely cause | Fix |
|---|---|---|
| Shells unroll while frying | Dough ball too large or too soft | Use marble-sized balls; add 1 tbsp atta |
| Soft centre, dark outside | Oil too hot | Drop to medium-low, fry 5 minutes |
| Greasy, heavy shells | Oil too cool | Reheat between batches |
| Ridges disappear | Dough sticking to the board | Dust the peeta lightly with atta |
| Rock-hard bite | Hot oil skipped in the dough | Add the 2 tbsp moyam next time |
| Crisp turns limp overnight | Stored while still warm | Cool fully, then seal the jar |
Substitutions and Spice Variations
This Karam Gavvalu Recipe takes substitutions well. Replace up to ¼ cup of the atta with fine rice flour if you want a lighter, more brittle shell. Black sesame seeds can stand in for ajwain, although the flavour turns nutty rather than sharp.
For frying, peanut or sunflower oil suits this snack because both hold a high smoke point. Some families add a pinch of asafoetida to the dough. Others sprinkle chaat masala over the shells while they are still warm, so the powder clings.
Storage and Shelf Life
Cool the shells from this Karam Gavvalu Recipe completely on a wire rack before storing them. Warm shells release steam, and that steam is what turns a crisp batch limp inside a sealed jar. Store in a genuinely airtight container at room temperature.
Kept dry, they stay crunchy for 10 to 12 days. If humidity softens them, spread them on a tray and warm at 150°C for five minutes. Let them cool again before you reseal the jar.
Nutrition Estimate Per Serving
The figures below are an estimate for one serving of this Karam Gavvalu Recipe, roughly 12 shells. They are calculated from standard values for whole wheat flour, semolina and absorbed frying oil, using reference data from USDA FoodData Central. Actual numbers shift with shell thickness and frying temperature.
| Nutrient | Approximate amount |
|---|---|
| Energy | 205–225 kcal |
| Carbohydrates | 30 g |
| Fat | 9–11 g |
| Protein | 4 g |
| Fibre | 3 g |
| Sodium | 190 mg |
Deep-fried snacks are a treat rather than daily food. Anyone managing blood sugar, cholesterol or sodium should treat these numbers as indicative and check with a qualified dietitian.
When Andhra Families Make Gavvalu
Gavvalu is strongly tied to Krishna Janmashtami, when the sweet version goes into the naivedyam plate. The spicy shells are made alongside for everyone who does not want more sugar. Families also fry big batches for Diwali, and again during Sankranti, when snack tins get refilled every other day.
In our kitchen the shaping happens on the floor, on a spread newspaper, with three people working at once. One rolls balls, one shapes, one fries. That division is why a festival batch takes an afternoon rather than a week. You will find similar timing logic in our Diwali sweets and snacks planner.
Before You Start Frying
Get three things right and this Karam Gavvalu Recipe works on the first attempt. Keep the dough stiff, keep the balls marble-sized, and keep the flame at medium-low. The hot oil in the dough is the fourth quiet essential, so do not leave it out.
Shape every shell before you light the burner. Frying goes fast once it starts, and hunting for shells mid-batch is how oil overheats. Make a half batch first if this is new territory.
FAQs About the Karam Gavvalu Recipe
What does karam gavvalu mean?
Karam means spicy or hot in Telugu, while gavvalu means shells. Together the name describes small shell-shaped snacks with chilli and pepper kneaded into the dough. The sweet counterpart is called teepi gavvalu.
Can I make this Karam Gavvalu Recipe without a gavvalu peeta?
Yes. A clean fork, a new comb, or the ridged back of a grater all work. The ridges will be shallower than a wooden peeta gives, so the shells look less defined. The taste and crunch stay the same.
Why did my gavvalu turn soft after a day?
Moisture is almost always the culprit. Storing shells before they cool completely traps steam inside the jar. Humid weather does the same over two or three days. Re-crisp them at 150°C for five minutes.
Can I use maida instead of wheat flour?
You can, and the shells will be lighter and paler. Wheat flour gives a nuttier flavour and more fibre, though it needs slightly more water. If you switch to maida, reduce the water by about two tablespoons.
How many gavvalu does this recipe make?
Roughly 70 to 90 shells, depending on how small you pinch the dough. That works out to about six servings of a dozen shells each. The count drops quickly if the balls creep larger than a marble.
Is this Karam Gavvalu Recipe vegan?
Yes, as written it contains no dairy. The dough uses oil rather than ghee, so it suits a vegan diet. Some traditional versions swap in ghee for richer flavour, which changes that.
Can I prepare the dough in advance?
Refrigerate the dough for up to 24 hours in a sealed box. Bring it back to room temperature and knead briefly before shaping, because cold dough cracks on the peeta. Do not freeze it, since the semolina turns grainy.
What is the best oil temperature for frying gavvalu?
Medium-low, roughly 160 to 170°C, gives the most reliable result. A scrap of dough should rise steadily in four to five seconds at that heat. Anything hotter browns the surface before the inside dries out.
Bhimas Cook is an independent home-cooking blog. Recipes here are family methods tested in a home kitchen, not commercial or institutional formulations. Nutrition figures are estimates and are not medical or dietary advice.