Rasam Recipe Without Onion and Garlic: Easy Sattvic Method
A good Rasam Recipe Without Onion never tastes like something has been left out, and that surprises most first-time cooks. The secret is not extra chilli or a heavier hand with the spice tin. It is asafoetida bloomed in hot ghee, plus knowing the exact second to switch off the flame. Get that single moment right, and this tangy South Indian broth tastes rounder and more comforting than many versions built on onion and garlic.
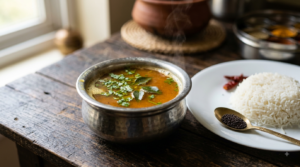
A hot bowl of rasam made without onion or garlic, finished with a mustard-seed and curry-leaf tempering.
Rasam Recipe Without Onion at a Glance
- What it is: a thin, tangy tamarind-and-tomato broth, sipped as soup or poured over hot rice.
- Total time: about 40 minutes, and most of it is hands-off simmering.
- Serves: 4 people as part of a South Indian meal.
- Diet: sattvic, vegetarian, and easily vegan when you temper in oil instead of ghee.
- Flavour profile: sour from tamarind, savoury from hing, warm from pepper and cumin.
- The one rule: never let it hit a rolling boil once the rasam powder goes in.
Because this Rasam Recipe Without Onion skips both alliums, it suits Ekadashi, Sankranti, Navratri, temple naivedyam, Jain kitchens, and any household following a sattvic diet. It also helps people who simply cannot digest onion and garlic comfortably.
Why This Rasam Recipe Without Onion Tastes Complete
Onion and garlic contribute two things to a broth: a sulphurous savoury depth and a faint background sweetness. Asafoetida replaces the first almost exactly, since it carries similar sulphur compounds. Tomato and a small pinch of jaggery cover the second.
Rasam is a traditional South Indian preparation that predates the wide use of onion in temple and Brahmin kitchens. So the no-onion version is not a compromise at all. A Rasam Recipe Without Onion is closer to how many families in Tamil Nadu, Karnataka, and Andhra Pradesh have always made it.
Hing does the heavy lifting
Hing must be bloomed in fat to work. When you drop it straight into watery rasam, it clumps and leaves raw, medicinal pockets of flavour. Therefore it belongs in the tempering pan, never stirred into the pot.
Use a genuinely small quantity. Two pinches is right for four servings, while a heaped spoon will overwhelm everything else in the bowl.
Rasam Recipe Without Onion: Ingredients and Quantities
These are the measurements for four servings of this Rasam Recipe Without Onion. Nothing here contains onion or garlic, so the whole list stays festival-safe.
- Ripe tomatoes: 4 medium, roughly 400 g, chopped
- Tamarind paste: 2 tbsp, or extract from 30 g whole tamarind
- Rasam powder: 1½ tbsp, store-bought or the homemade mix below
- Turmeric powder: ½ tsp
- Red chilli powder: ¾ tsp
- Black pepper powder: ½ tsp, freshly crushed if possible
- Jaggery: ½ tsp, grated (optional but strongly recommended)
- Salt: about 1 tsp, added at the end
- Water: 4½ cups, plus ½ cup warm water for soaking the tamarind
- Fresh coriander leaves: ¼ cup, chopped
- Curry leaves: 1 sprig, about 8 to 10 leaves
For the tempering, or tadka, keep these ready in a small bowl:
- Ghee or neutral oil: 2 tsp
- Mustard seeds: 1 tsp
- Cumin seeds: ½ tsp
- Dry red chillies: 2, broken
- Asafoetida (hing): 2 pinches
Recipe card
| Detail | Value |
|---|---|
| Prep time | 15 minutes |
| Cook time | 25 minutes |
| Total time | 40 minutes |
| Servings | 4 |
| Difficulty | Easy |
| Cuisine | South Indian |
How to Make Rasam Recipe Without Onion Step by Step
1. Extract the tamarind (5 minutes)
Soak 30 g tamarind in ½ cup warm water for five minutes. Then squeeze the pulp with your fingers and strain out the fibres. If you are using ready-made paste instead, whisk 2 tbsp into ½ cup water until it dissolves smoothly.
2. Cook the tomatoes down (7 minutes)
Add the chopped tomatoes and ½ cup water to a medium pot over medium heat. Cover and cook for about seven minutes, until they collapse into a pulp. Mash them lightly with the back of a ladle so no firm pieces remain.
This mashing step matters more than people expect. Because the tomato skin holds structure, unmashed pieces leave the broth watery and unevenly sour.
3. Add spices and tamarind (5 minutes)
Stir the turmeric, chilli powder, black pepper, jaggery, and rasam powder into the tomato base. Pour in the tamarind extract and mix well. Simmer uncovered on low heat for five minutes so the raw tamarind edge cooks off.
4. Add water and watch for froth (5 minutes)
Pour in the remaining 4 cups of water and stir once. Keep the flame low. Within a few minutes a white froth will creep across the surface, and tiny bubbles will appear at the rim.
Switch off the heat the moment that froth covers the top. Add the salt now, not earlier. This is the step where most rasam goes wrong, and the next section explains exactly why.
5. Make the tempering (3 minutes)
Heat the ghee in a small pan over medium heat. Add mustard seeds first and wait until they crackle. Then add cumin seeds, broken red chillies, curry leaves, and hing, and let everything sizzle for roughly 20 seconds.
Pour the hot tempering straight into the rasam. Cover the pot immediately for two minutes so the aroma stays trapped inside rather than escaping into your kitchen.
6. Garnish and serve (2 minutes)
A Rasam Recipe Without Onion is at its best within minutes of the tempering. Stir through the chopped coriander and serve piping hot.
Ladle it over steamed rice with a spoon of ghee. You can also drink it plain from a tumbler on a cold evening.
The Step Almost Every Rasam Recipe Gets Wrong
Search results are full of instructions telling you to bring rasam to a boil after adding rasam powder. That single line ruins more pots of rasam than any other mistake. A hard boil after the tamarind and powder go in turns the sourness sharp and slightly bitter, and it flattens the spice aroma you just built.
A Rasam Recipe Without Onion suffers most from this, because it has no allium sweetness to fall back on. Traditional Tamil kitchens have a word for the result: the rasam has gone hard, or kaduthu pogum. Older cooks also had a practical reason, since rasam was made in tin-coated eeya chatti pots that could not take prolonged heat.
The froth test
Watch the surface instead of the clock. A finished rasam announces itself with a pale, foamy layer that spreads across the top while the liquid underneath is still barely trembling. That froth is your signal to switch off.
If you see a rolling boil, you have already gone past the mark. The rasam is still edible, though the bright top notes will have dulled noticeably.
Why salt goes in last
Salt added early encourages the tamarind to taste harsher as it reduces. So season at the froth stage instead, taste once the tempering is stirred through, and adjust then.
Homemade Rasam Powder in Five Minutes
Store-bought rasam powder works in a Rasam Recipe Without Onion, but a freshly roasted mix is noticeably better. Dry roast these on low heat until fragrant, cool completely, then grind coarsely.
- Coriander seeds: 1 tbsp
- Toor dal: 2 tsp
- Cumin seeds: 1 tsp
- Black peppercorns: 1 tsp
- Dry red chillies: 2 to 3
- Fenugreek seeds: a scant pinch, no more
Keep the grind coarse rather than fine. A powder-fine mix clouds the broth and settles at the bottom of the bowl within minutes.
Fenugreek is the ingredient to watch. Even slightly too much turns the whole batch bitter, and no amount of jaggery will rescue it afterwards.
Is Your Hing Actually Onion-Free and Gluten-Free?
Every Rasam Recipe Without Onion depends on hing, so the brand you buy matters. Here is a detail most no-onion recipes never mention.
Pure asafoetida resin is too sticky to measure, so manufacturers compound it with a carrier powder. Wheat flour has historically been the standard carrier.
Compounded hing sold in Indian shops can therefore contain a large proportion of wheat flour by weight. That matters enormously if anyone at your table has coeliac disease, because a dish you assumed was gluten-free may not be.
Read the ingredient panel before you buy. Brands that use rice flour or gum arabic as the binder label themselves gluten-free, while the wheat-based ones usually list wheat flour first. The Food Safety and Standards Authority of India (FSSAI) requires packaged foods to declare such ingredients, so the information is on the pack.
Also check for added salt or colour, since some cheaper compounds carry both. Neither belongs in a rasam where you are controlling seasoning carefully.
Troubleshooting a Rasam Recipe Without Onion
A Rasam Recipe Without Onion is forgiving if you diagnose the problem correctly. Use this table before you throw anything out.
| Problem | Likely cause | Fix |
|---|---|---|
| Bitter aftertaste | Boiled hard after adding powder, or too much fenugreek | Add ¼ tsp jaggery and a splash of hot water; do not reheat hard |
| Too sour | Strong tamarind paste, or very acidic tomatoes | Dilute with hot water, then add jaggery and a little more rasam powder |
| Tastes flat | Salt added too early, or hing skipped | Adjust salt at the end and add a second small tempering |
| Too watery | Tomatoes were not mashed, or water overshot | Whisk in 2 tbsp cooked toor dal for body |
| Harsh, medicinal smell | Hing burnt in the pan or overused | Lower the flame next time and add hing last, off the heat |
Tamarind strength varies wildly between brands. Therefore taste the broth before the tempering rather than after, since the tadka masks small imbalances until it is too late to correct them cleanly.
Variations Worth Trying
Once the base Rasam Recipe Without Onion is familiar, these variations use the same timing and technique.
- Dal rasam: whisk in ½ cup cooked, mashed toor dal for a thicker, more filling broth.
- Pepper rasam: double the black pepper and drop the chilli powder, which suits a cold or a sore throat.
- Lemon rasam: skip the tamarind entirely, then stir in 2 tsp lemon juice after switching off the flame.
- Jeera rasam: crush 1 tsp cumin with the pepper for a warmer, earthier finish.
- Coconut milk rasam: add ¼ cup thin coconut milk at the end, though it must never boil afterwards.
For a garlic-forward contrast, the same broth logic appears in this garlic rasam without tomato, while the Fiji-style pepper rasam shows how far the dish travelled.
Storing and Reheating Rasam Recipe Without Onion
Cool the rasam completely before it goes into the fridge. Stored in an airtight container, it keeps well for up to three days.
Reheat gently on the stovetop and stop before it boils. Because the aroma fades in storage, a fresh half-tempering of mustard seeds and curry leaves brings it straight back.
You can freeze the broth base for up to a month, although the tempering should always be added fresh after thawing. A useful shortcut is to make extra tamarind extract and refrigerate it separately, so a weeknight pot takes barely fifteen minutes.
Nutrition Per Serving (Estimate)
| Nutrient | Approximate value |
|---|---|
| Calories | 80 kcal |
| Carbohydrates | 12 g |
| Protein | 2 g |
| Fat | 3 g |
| Fibre | 2 g |
| Sodium | 350 to 450 mg |
These figures are calculated estimates from standard ingredient values, not a laboratory analysis. Actual numbers shift with your salt, your tamarind, and whether you use ghee or oil. You can check individual ingredient values on USDA FoodData Central if you track intake closely.
One brief health note. Rasam is tangy and pepper-forward, so people managing acid reflux, ulcers, or a sodium-restricted diet should go easy on the tamarind and salt. Rasam is a comforting food during a cold, though it is not a treatment, and anyone unwell should still speak to a doctor.
What to Serve With a Rasam Recipe Without Onion
A Rasam Recipe Without Onion belongs beside plain food that lets the broth lead. Steamed rice with a spoon of ghee is the classic pairing, ideally with appalam on the side. Curd rice afterwards is the traditional South Indian sequence, since the cooling curd balances the pepper.
Rasam also works alongside idli, dosa, or a simple poriyal. For a full sattvic meal, pair it with a no-onion Tamil Nadu style sambar for rice and a festival sweet such as Ugadi pachadi.
What Home Cooks Get Wrong
- Rushing the tomatoes: undercooked tomato leaves a raw, tinny edge that no spice covers.
- Adding hing to the pot: it needs hot fat to bloom, so it always goes in the tadka.
- Grinding rasam powder too fine: a coarse grind keeps the broth clear and the aroma alive.
- Skipping jaggery: half a teaspoon rounds the sourness without making the rasam sweet.
- Reheating at high heat: a second hard boil undoes everything the first careful simmer achieved.
- Old curry leaves: limp leaves add almost nothing, while fresh ones perfume the entire pot.
Before You Cook This Rasam Recipe Without Onion
A Rasam Recipe Without Onion rewards technique far more than a long shopping list. Cook the tomatoes until they properly collapse, bloom the hing in ghee, and switch off at the froth rather than the boil. Salt goes in at the end, and jaggery goes in whenever the tamarind feels aggressive.
If you make it once with a freshly roasted rasam powder, you will probably never buy a packet again. Start with the base recipe above, then move on to the pepper or dal variation next week.
Frequently Asked Questions
Can I make rasam without tamarind?
Yes. Use 2 tsp lemon juice or kokum extract stirred in after you switch off the flame. The sourness will taste brighter and less earthy than tamarind, so start small and taste before adding more.
Does a Rasam Recipe Without Onion taste bland?
No, not when the asafoetida is bloomed properly in hot ghee. Hing carries sulphur compounds similar to those in alliums, so it supplies the same savoury backbone. Fresh curry leaves, cracked pepper, and a pinch of jaggery complete the flavour.
Is this Rasam Recipe Without Onion suitable for fasting days?
It suits most sattvic and no-onion-no-garlic observances, including Ekadashi meals and temple-style naivedyam. Fasting rules differ by community and family tradition, though, so check whether tamarind and mustard seeds are permitted in your practice.
Can I add dal to this rasam?
Yes. Whisk ½ cup cooked, mashed toor dal into the broth just before the tempering. Add a little extra water too, because dal thickens the rasam noticeably as it stands.
Why did my rasam turn bitter?
Two causes account for nearly every bitter batch. Either the rasam boiled hard after the powder went in, or the spice mix carried too much fenugreek. Add a quarter teaspoon of jaggery and a splash of hot water to soften the edge.
Is this recipe vegan and gluten-free?
It is vegan when you temper in oil rather than ghee. Gluten-free depends entirely on your asafoetida, since many compounded brands use wheat flour as a carrier, so check the label carefully.
Can I make rasam in a pressure cooker?
You can cook the tomatoes in a cooker for one whistle to save time. Never pressure cook the finished rasam, however, because the sealed high heat produces exactly the bitterness you are trying to avoid.
How long does a Rasam Recipe Without Onion keep?
Refrigerated in an airtight container, it stays good for three days. Reheat gently without boiling, and refresh the aroma with a small fresh tempering before serving.
Rasam or sambar, which one is thinner?
Rasam is the thinner of the two and is meant to be sipped or mixed loosely into rice. Sambar is thicker, built on cooked dal and vegetables, and uses a different spice blend altogether.