Dal Rasam Recipe: Authentic South Indian Comfort Bowl
Dal rasam recipe is the South Indian comfort bowl most home cooks reach for when a meal needs warmth, tang and a little soothing heat. This version leans on cooked toor dal, tamarind and a good rasam powder, so it tastes like the rasam that simmers in Tamil Nadu and Andhra Pradesh kitchens every single day.
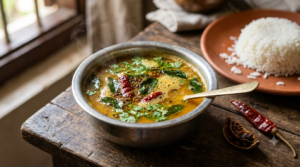
A hot bowl of dal rasam finished with ghee tempering, curry leaves and fresh coriander.
Rasam is a staple across South India, served over steamed rice or sipped like a peppery soup, as Wikipedia notes. What sets a home dal rasam apart is balance, because the sour, spicy and savoury notes must sit in harmony rather than fight each other. Get that balance right, and you will quickly understand why people always ask for a second ladle.
Dal rasam at a glance
Here is the short version of this dal rasam recipe before we get into the detail, so you know exactly what you are signing up for.
- Base: mashed toor dal, tamarind water, tomato and rasam powder.
- Total time: about 50 minutes, since most of it is hands-off simmering.
- The golden rule: never let rasam hit a rolling boil, because that turns it bitter.
- Serves: 4, either over rice or as a warming soup.
- Skill level: easy, so it suits first-time cooks as well as seasoned ones.
What makes this dal rasam recipe worth cooking
Dal rasam is a soup-like dish built on cooked lentils, tangy tamarind and freshly crushed pepper. The dal gives it body, while the tamarind and tomato bring the tang that makes rasam so appetising. Rasam powder ties the whole pot together with coriander, cumin and chilli warmth.
Because this is a home-style version, this dal rasam recipe skips shortcuts and keeps the flavour honest. The toor dal at its heart is a protein-rich lentil that mashes into a smooth, comforting base. Many quick online recipes rush the simmer or overboil the pot, so their rasam tastes flat. This one walks you through the timing that actually matters, and it corrects the mistakes that ruin most beginner attempts.
Ingredients for this dal rasam recipe
Everything here is a regular Indian pantry item, so you likely have most of it already. Measurements below serve four people comfortably.
| Detail | Value |
|---|---|
| Prep time | 20 minutes |
| Cook time | 30 minutes |
| Total time | 50 minutes |
| Servings | 4 |
| Difficulty | Easy |
- ½ cup toor dal (arhar dal), rinsed well and soaked for 15 minutes
- 1.5 cups water to cook the dal, plus 2 cups for the rasam
- 1 lemon-sized tamarind ball, soaked in ½ cup warm water
- 1 large tomato, chopped
- 2–3 tsp rasam powder, store-bought or homemade
- ½ tsp turmeric powder
- 1 tsp freshly crushed black pepper
- ½ tsp salt, adjusted to taste
- 1 tsp jaggery (optional, for balance)
- A handful of fresh coriander leaves, chopped
For the tempering: 2 tbsp ghee or oil, 1 tsp mustard seeds, 1 tsp cumin seeds, a pinch of asafoetida (hing) and 8–10 curry leaves.
How to make dal rasam recipe step by step
This dal rasam recipe follows five stages, and the timings will keep you on track. Read the boiling rule further down before you start, since it decides whether your rasam sings or sulks.
1. Pressure cook the dal (15 minutes)
Drain the rinsed toor dal and add it to a pressure cooker with 1.5 cups water and the turmeric. Cook until you get 3 whistles, which takes roughly 10–12 minutes. Once the pressure drops and it cools a little, mash the dal until smooth and keep it aside.
2. Prepare the tamarind water (5 minutes)
While the dal cooks, soak the tamarind in warm water for about 5 minutes. Then mash it with your fingers and strain out the juice, because the pulp and fibre should not go into the pot. This tangy extract is the backbone of the rasam.
3. Start the rasam base (5 minutes)
In a heavy-bottomed pot, combine the tamarind juice, chopped tomato, rasam powder, crushed pepper and salt. Pour in 2 cups of water and bring it to a boil on medium heat. This stage cooks off the raw edge of the tamarind and the spices together.
4. Add the mashed dal and simmer (10 minutes)
When the base boils and the aroma lifts, lower the heat right down. Stir in the mashed dal until the pot looks smooth and even. Let it simmer gently for 7–10 minutes, until a light froth appears on the surface. That froth is your signal, so watch for it rather than the clock.
5. Add the tempering or tadka (5 minutes)
Heat the ghee in a small pan and add the mustard seeds. Once they crackle, add the cumin seeds, hing and curry leaves, and fry until the leaves crisp up. Pour this sizzling tempering straight into the hot rasam, then switch off the heat and garnish with coriander.
The one rule that makes or breaks rasam
Never let rasam reach a hard, rolling boil after the rasam powder goes in. A vigorous boil makes the broth bitter and flattens the spice, which is why so many home attempts taste dull. Instead, keep the heat low and turn it off the moment a light froth rises to the top.
Experienced South Indian cooks treat this froth as the finish line. Once you see it, the rasam is done, so cover the pot and let it rest for 5 minutes before serving. That short rest lets the flavours settle, and it is the single habit that separates good rasam from great rasam.
Pro tips for the best dal rasam recipe
These small moves come from years of everyday cooking, and they make a real difference.
- Crush your black pepper fresh, because pre-ground pepper loses aroma fast.
- Add jaggery to round off the sour tamarind and sharp spice, since a pinch of sweetness balances the whole bowl.
- If the rasam thickens too much, loosen it with a splash of hot water and warm it briefly.
- Stir in coriander leaves only after the heat is off, so they stay fresh and fragrant.
- Use a heavy-bottomed pot, because it holds gentle heat and stops scorching.
Common mistakes that ruin dal rasam
Rasam looks simple, yet a few slips trip up most beginners. Here is how to spot and fix them before they spoil the pot.
- It tastes bitter: you boiled it too hard. Simmer gently next time and switch off at the froth.
- It tastes flat: your spices are stale, so refresh your rasam powder and use fresh pepper.
- It is too sour: you added too much tamarind. Balance it with a little jaggery, or dilute with hot water.
- It turns watery: the dal was not mashed enough, or the water outweighed the dal. Mash well and adjust the ratio.
- The tempering burns: your ghee was too hot. Keep the flame medium, and add curry leaves last.
Variations: dal types and regional styles
Rasam changes from house to house and from state to state, which is part of its charm. Once you master this dal rasam recipe as a base, these swaps open up a whole family of flavours.
You can use moong dal instead of toor dal for a lighter bowl, although you will need slightly less water and cooking time. For a garlicky punch, crush a few cloves into the tempering. Each southern state also has its own signature, so it helps to explore a Kerala-style rasam or a traditional Tamil Nadu rasam when you want variety.
If you prefer the tangier, spicier profile of coastal Andhra kitchens, the Andhra-style rasam leans harder on chilli and tamarind. Meanwhile, the Karnataka-style rasam often carries a gentler, slightly sweet balance. Each one uses the same froth rule, so your new skill carries straight over.
How to make rasam powder at home
Store-bought rasam powder works fine, yet a fresh homemade blend lifts the whole dish. The aroma of just-roasted spices is hard to beat, and it is genuinely quick to make.
Dry-roast 2 tablespoons coriander seeds, 1 tablespoon cumin seeds, 1 teaspoon black peppercorns and 4–5 dried red chillies until fragrant. Let them cool, then grind to a coarse powder. This keeps in an airtight jar for a couple of weeks, so you always have a batch ready. Because you control the chilli and pepper, you can tune the heat to your family’s taste.
Serving suggestions and what to pair
Serve this dal rasam recipe piping hot over steamed rice with a small spoon of ghee, since that combination is pure comfort. It also shines alongside a dry vegetable stir-fry or a crisp pongal for a fuller South Indian plate. On cooler evenings, ladle it into a mug and drink it like a spiced soup.
Rasam and rice suit anyone recovering from a heavy meal, because the bowl feels light and clean. A simple papad or appalam on the side adds crunch without stealing the show.
Storage and make-ahead notes
Rasam keeps well, so it is handy to cook a slightly larger batch. Follow these simple limits to keep it tasting fresh.
- Refrigerate leftovers in an airtight container for up to 2 days.
- Reheat gently and never boil it hard, because reboiling dulls the flavour.
- Add a splash of water while reheating if it thickened after cooling.
- For longer storage, freeze in portions for up to 1 month, then thaw and warm through before serving.
Dal rasam recipe nutrition per serving
The figures below are an approximate estimate for one serving, so treat them as a guide rather than exact values. Your actual numbers will shift with the ghee, dal quantity and rasam powder you use.
| Nutrient | Approximate per serving |
|---|---|
| Calories | ≈115 kcal |
| Protein | ≈5 g |
| Carbohydrates | ≈18 g |
| Fat | ≈3 g |
| Fibre | ≈2 g |
Most of the protein comes from the toor dal, while the tempering adds a little fat. Because rasam is mostly liquid, it stays light even when you go back for more.
Is dal rasam good for you?
Dal rasam is light, largely liquid and built on lentils, so it makes an easy, gentle meal. The warming spices, such as pepper and cumin, are traditionally enjoyed for comfort after a rich meal. Tamarind and tomato also add a fresh tang and some vitamin C.
These are everyday, traditional benefits rather than medical claims, so enjoy rasam as part of a balanced diet. If you follow a special diet or manage a health condition, it is sensible to check with a qualified professional before making changes.
Before you ladle it out
A great dal rasam recipe comes down to three things: fresh spices, the right sour-spicy-sweet balance and a gentle simmer that never boils over. Nail those, and even a first attempt will taste like it came from a seasoned kitchen. Keep the tempering generous and the coriander fresh, because those final touches carry the aroma. Cook it once with care, and it will earn a permanent spot in your weekly rotation.
Frequently asked questions
Can I make rasam without dal?
Yes, a lighter rasam works with just tamarind, tomato and spices, and you can sip it as a broth. The dal simply adds body and protein for a fuller bowl. Both versions use the same simmer-and-froth method.
How do I adjust the spiciness?
Reduce the rasam powder or crushed pepper for a milder bowl, since those two carry most of the heat. For a different kind of warmth, add a slit green chilli instead of extra pepper. Taste as you go, because it is easy to add more but hard to take it back.
Why should rasam not be boiled?
A hard boil after adding rasam powder makes the broth bitter and flattens the aroma. Keep the heat low and switch off the moment a light froth rises. This one habit improves the flavour more than any other single step.
What dal is best for dal rasam?
Toor dal (arhar dal) is the classic choice, because it mashes smooth and gives the rasam its signature body. Moong dal works for a lighter version with a quicker cook time. Cook whichever you use until it is soft enough to mash easily.
Can I use tamarind paste instead of a tamarind ball?
Yes, mix about 1 teaspoon of tamarind paste into warm water to replace the soaked ball. Add a little more if you like it tangier, since paste concentration varies by brand. The goal is a pleasant sourness, not a sharp one.
Is dal rasam good for digestion?
Many people find the warming spices in rasam, like cumin and pepper, comforting after a heavy meal. It is light and easy to eat, which is why it is a common home remedy for feeling heavy. These are traditional comforts rather than medical treatments.
How long does dal rasam stay fresh?
Refrigerated in an airtight container, dal rasam keeps for up to 2 days. Reheat it gently without a hard boil to protect the flavour. You can also freeze portions for up to a month for later.